Showing posts with label lemon. Show all posts

Sunday, March 31, 2013

Meyer Lemon Cake with Coconut Frosting!

Happy Easter everyone!!! While Mikey was cooking brunch at the Sunny Spot, I spent the day baking! I will shortly be dyeing some late night eggs with my mother, and forcing my father to watch the millionth episode of Doctor Who. Easter is a moveable feast, not falling on a linked date on the calendar. Easter is the celebration of Christ resurrecting from death. It is at the end of lent, and falls after Good Friday, commemorating the crucifixion of Christ.

This Holy Day is remembered and celebrated through classic traditions through families sharing meals and attending church service, and through non-religious traditions such as fabulous mimosas, Easter baskets full of candy, we dye Easter eggs, eat peeps, and take kids to look at the Easter bunny.

I have always felt that Easter is the true beginning of Spring and I wanted to build a cake that captured the essence of spring, something light, fun, pretty, and not to mention delicious! Two flavors I love and feel that represent the Spring, and would be wonderful together, are Meyer lemon and coconut. This is why I have created a Meyer lemon layer cake iced with coconut frosting and coconut flakes.

*If you want your baking to be super duper accurate use a scale which you can set to zero to measure out equal parts for baking.

Ingredients:
Frosting:

1 14 oz can unsweetened coconut milk
1 cup unsalted butter
2 ½ cups powdered sugar
Cake:

16 tbsp. unsalted butter, softened, plus more for pans
2 1/2 cups cake flour, plus more for pans, sifted
2 1/2 tsp. baking powder
4 eggs
1 tsp. kosher salt
1/2 cup milk
1 tsp. vanilla extract
1 1/2 cups sugar
1 lemon’s zest


Star by preheating the oven to 350°. Butter and flour two 9″ cake pans, and set aside, leaving the 1 cup of butter out to soften. Get one small, medium, and large bow and put to the side.

In a medium bowl sift together your flour, baking powder, and salt, then set aside.

In a small bowl whisk together milk and vanilla in a bowl, set aside.

In a large bowl, cream butter, 1 1/2 cups sugar, and zest on medium-high speed until pale and fluffy, about 3 minutes. Add eggs, one at a time, beating well after each addition. On low speed, alternately add dry ingredients in 3 batches and wet ingredients in 2 batches. Increase speed to high and beat until batter is smooth, about 5 seconds.

Using your scale, pour out the batter so that it is equally divided between prepared pans, and smooth top with a rubber spatula, then drop pans lightly on a counter to get rid of any large air bubbles.

Place in oven on the same rack next to each other for about 40 minutes, or until a toothpick inserted in middle comes out clean. Let cakes cool for 20 minutes in pans, invert onto wire racks, and let cool.

While your cakes are cooling, you are going to prepare your reduced coconut milk. It is very simple, basically you are going to take a deep sauce pan and pour out your coconut milk, and heat on a medium high heat. The milk will come to a boil, and you will need to stir it while it reduces to a desired thickness, about 25 minutes. Pour out into a bowl, and chill.

Using an electric mixer, beat butter until smooth. Add sugar, once cooled down add a 1/3 of a cup of reduced coconut milk, and blend together a delicious frosting has been created.

Now start to prepare the cakes by cutting the rounded top of the cake off and discard. Next, using a ruler, mark halfway up the cake and using a serrated knife cut through to create two layers. To create the cake put one layer of cake down, then spread frosting, top with coconut flakes, then add next cake layer and continue. Frost all the surrounding parts of the cake and cover in coconut frosting.

To add the finishing touch, top the cake with either a peep or like we used a few malt balls that look like Easter eggs. Enjoy! Happy Easter!

Thursday, February 14, 2013

Valentine's Day Lemon Shortbread Cookie!


Happy Valentine’s Day!! We hope that you enjoy it, and spend it with the people, places, and animals, whatever you love! We are grateful for our parents, our siblings, our friends, neighbors, and our puppies and pet fish! Show the people you love a little appreciation today and whip up a batch of these delicious lemon shortbread cookies. They are so easy to make, and you can make them special by painting your loved ones name on the cookie. We decided to paint initials in a calligraphy style that keeps the look elegant and beautiful as a gift in itself.

* To write the initials you will need a tiny paint brush.

Happy Valentine’s Day!

Ingredients: Makes about a dozen

Cookie:

1 cup butter, softened
½ cup granulated sugar
1 tablespoon lemon zest
2 ½ cups all-purpose flour
¼ cup lemon juice

Icing:

1 cup confectioners sugar
2 teaspoons milk
¼ teaspoon almond extract
Yellow food coloring
Blue food coloring


To start preheat your oven to 325 degrees, and let your butter sit out to soften. Cream butter and sugar together until completely combined. Add lemon zest and lemon juice, and mix. Now add flour a little at a time. The dough will seem really dry, but you will dump it out on to a flat surface and knead together by hand, it will meld together really nicely. Dust a rolling pin with flour and roll the dough out to be about a ¼” thick. Using a heart shaped cookie cutter, cut out cookies, lay on a dusted baking sheet, and bake for 20 minutes or until golden brown on the edges.

Once baked, pull out and let cool. While cooling, mix together all of the ingredients for the icing, except the blue food coloring. Color with the yellow food coloring until you reach the desired color. Once cookies are cooled, using a small spatula, cover the cookie in the icing. If you want to make the icing dry faster, you can add a teaspoon of cream of tartar into the mix. Let the icing dry completely before you paint names on.

Once the icing dries, place a drop of two of blue food coloring into a small bowl and a drop of water. Using your very small paint brush, dip into the mix and paint the initials of the one you love.

Now eat your cookies or give them out to the one you love!

Sunday, August 26, 2012

August Artichoke Salad


Michael works at an Italian restaurant which makes one of my mother’s favorite salads. It is a pretty classic Italian staple, and there are really no variations of it, because it consists of four ingredients, and man do they marry together beautifully. So Michael and I are giving you the simple recipe to our simple artichoke summer salad. My mommy is going to be so happy!
*For some color we finely chopped some basil and mixed it with olive oil and drizzle around the plate. This is purely for show though, so don’t worry about the recipe.

Ingredients: for 4

10 baby artichokes
A block of Parmesan Reggiano
4 lemons
4 Tlb. Olive oil
Tsp. salt
Pinch of black pepper


The first part of this recipe involves preparing and soaking the artichokes overnight. Prepare a water bath for the artichokes, by filling a bowl with water and three lemons cut in half. To prepare the artichoke, cut the stem down to about a ¼ of an inch to the bottom, and then peel off a good portion of the leaves with all of the pricklies on it, until you are left with the light green leaves, and then cut about a ¼ inch of the top off. Now take a knife and scrape off the rough stuff from the stem. Place the artichokes in the water, place a towel in the water to keep it from oxidizing, and then place in refrigerator overnight.
Take the artichokes out of the water and peel back about 4 more layer of leaves, essentially all of the oxidized ones, and using a knife clean off the rest of the stem until it turns into a point. Cut the artichokes in half and slice the half paper thin. Place artichoke in a bowl with olive oil, lemon juice from one of the lemons sitting in the water, salt, and a pinch of black pepper, and using your hands mix the artichokes breaking them up a bit with your fingers.
When plating, use your hands and make a mound with the artichoke. Shave about three pieces of parmesan and place on top of the salad. Slice the lemon that is left over and serve with the salad.

Eat!! You will be sure to love this bright simple salad.


Wednesday, August 1, 2012

The Devil's Summer Chicken


The name of this chicken might be alarming, but don’t be scared! This chicken is loosely based on a classic Italian recipe of Pollo Fra Diavolo which means chicken for the devil, or chicken from Hell. This is a spicy yet refreshing chicken dish made of juicy olive oil, bright lemon juice, and an amazing pop of red chili flakes. We want to bring this amazing and refreshing pop of flavors and serve it as an appetizer dish, a little teaser at our summer BBQs. We use small chicken drummettes as the perfect finger food that delivers a big punch! Try it at your next BBQ!!
*This requires marinating, a minimum of one hour, max 24 hours. We marinate about 24 hours because the longer you marinate the juicier the chicken and the more the flavors get soaked up.

Ingredients: (serves 3-4; based on two per person)

Pack of chicken drummettes about 8
Two lemons
Two teaspoons chili flakes
½ cup olive oil (enough to half cover drummettes)
½ teaspoon salt
½ teaspoon pepper
Teaspoon garlic salt


Season both sides of drummettes with salt and pepper and sprinkle a pinch of chili flakes. Place the drummettes in a dish with some depth, and fill with oil so that it is half way covering the chicken. Squeeze juice of one lemon and sprinkle with a half teaspoon of chili flakes, and a half teaspoon of garlic salt. Let marinate in the refrigerator for as long as you would like, at least 30 min up to 12 hours per side. Once you marinate for the desired time, flip the chicken and repeat the above steps. Turn on the broiler to high, and once you reach desired temperatures you can put the chicken in (Preferably use a broiler tray which is a tray with slots for the fat to drip down, this prevents fat for spitting up and catching fire). Place on cooking tray and sprinkle with a half of the left over chili flakes and cook on one side for 5 minutes, pull out, flip, add rest of chili, and cook another 5. While these are in the broiler heat up a grill pan on the stove to finish the chicken off, spray some pam or place a little olive oil on so they don’t stick. Place the drummettes on the grill pan and cook another 4-5 each side, or until you have that beautiful golden brown color we all love in chicken.
Serve chicken with slices of lemon, and we promise these will not disappoint.

Thursday, June 7, 2012

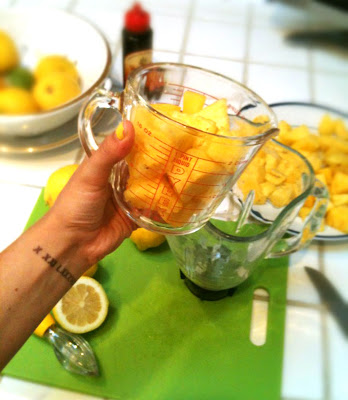
Simple Summer Pineapple Lemonade with Agave Syrup


Everyone loves an ice cold glass of lemonade during the summer. Everyone also loves the tropical fruit pineapple over the summer, so we thought to throw the two together and make it a party. Instead of using sugar to sweeten this, we went for the healthier and more robust flavors of agave syrup. There are three types of agave. Light: with is a neutral flavor, amber: a mild maple flavor, and raw: deep and bold. For this recipe I am using amber, because the maple is so delish.  With this recipe, feel free to add more water or agave to sweeten it.  This is made a little tart because we love acidic food, so taste and adjust.

Serves 5-6
5 cups chopped pineapple from 1 pineapple
9 lemons
4 cups water
6 Tlbs. Agave


In a blender puree your pineapple. Once all your pieces are pureed, pour the mix through a strainer, using a spatula to push all the juice out of the pulp. You can set aside the left over pulp to use in a another recipe, or just toss out. In the same blender (cleaned out) squeeze your lemons through the strainer, in order to catch all the seeds, with the help and hand juice. Once you squeeze all of your lemons, pour your pineapple juice, water, and agave in. (You may want to do this all in portions so you don’t overflow your blender!) Mix in the blender so that the agave mix evenly dissolves into the drink. Pout mix into pitcher filled with ice and serve. We serve with a slice of lime to add some color.
When life you give you lemons….make agave sweetened pineapple lemonade!!!!